With many new features Adobe Photoshop is promising to be the all in one tool for everyday users. Instead of image editing for web & family photos , working with 3D models & much more the Photoshop has also a GREAT feature of Creating even PDF files!!.
Although PDF files are not created using text files as we do in the Adobe professional, with Photoshop you can only create the files using images. As we all know the how much the PDF files are stable & are being used today. This can be of very good use if you want to make your own presentations for your business needs.
|
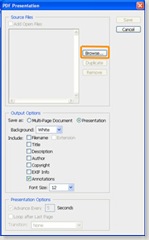
Creating PDF files using the Adobe Photoshop CS3 is quite easy, just have a look at the following steps :
{ Click to Enlarge }
{ Click to Enlarge }
|
In this way your images will be exported into PDF file which serve as a great format for showing up your presentations.
|
If you like my post, then feel free to subscribe to my post & get them sent into your Inbox .Click here
|


0 Comments:
Post a Comment