Showing posts with label Tips. Show all posts

An easy way to check how secure is your Password !

Friday, August 26, 2011

How strong is your Password ?


Are you worried if someone might hack your password which you are using for your Facebook, GMAIL,etc.


Here’s a cool website called HowSecureIsMyPassword.net which can help you to see how strong your password is. So all you have to do is just type in your password and it tells you instantly how much time would it take to hack your password. The longer the password more Strong it is.


So how strong is your password?


If you Love Struck loved my post, then feel free to subscribe to my feed Click here!

Read less and Understand better!

Saturday, March 5, 2011

image

I have been researching on this thing a lot and whether people like to read articles on websites to understand something. And I have to conclusion that most of the people on Internet are lazy. By saying lazy I mean that guys on Internet want to understand and learn things by spending less time and easily. Hope you guys got me. Open-mouthed smile.


So why am I Telling you this?


Simply getting to the point, If you blog then try to write less to explain something to your readers that is use less words and say many things. If there is a lot of text on your Blog then its very difficult to get some precious new readers for your dying blog Disappointed smile.  Writing more confuses the readers a lot and they get frustrated and bored easily, then all they do is leave your website ASAP!!.


Here’s the simple solution! to this problem :


‘’Always write precisely what you want to say in your blog and avoid using some hard vocabulary .’’


In my opinion this helps to give a better start to your new blog and help maintain your readers if your blog is getting old.


If you Love Struck loved  my post, then feel free to subscribe to my feed Click here!

Why and How to use labels in Blogs

Saturday, January 16, 2010

How to on Using Labels in Blog


Labels are great way to sort and mange the posts on your blog. When I started this blog, I was also not aware of what is the use of labels and how to use them.But they are one of the essentials in your every blog post. If you are also not using them then trust me you are missing a big thing in making up your blog.


Why and How to Use Labels ?


As the number of posts grow it is very difficult to show them up on your main blog page because your blog becomes to bulky to be opened up by a browser, so here comes the labels. They allow you to put different posts under different categories with specific words you choose. So whenever a person searches for any keyword on your blog then the posts with the same labels or keywords are showed up in the search results. This lets the viewers surf your blog in a very easy manner. For example the person search for posts related to Apple on your blog then all the posts with label apple are shown in the results.


Using Labels in Blogger blogs:


  • Open up your blogger account on blogger.com
  •  newMake a new post.


labels

  • Now after you finish writing your post, put the labels in the field “Labels for this post:”
  • Then click onpublish publish post.


Setting Labels in Blogger blogs:

  • After you have logged into your blogger account


layout

  • Go to Page Layout.


Click on Edit.

  • Under Blog Posts click on Edit.


Check the Labels..

  • Make sure that labels is checked so that the labels are visible in your blog posts.


  • Save and exit.


You should also show up the labels in your blog through tag clouds, i have found an amazing flash animated tag could @ bloggerbuster.com you can use it easily and it looks beautiful too!.Always try using main keywords for labels like technology for gadget articles, news for latest news posts and so on. So if you are not using labels then start using them now.


If you Love Struck loved  my post, then feel free to subscribe to my feed Click here!

How to reduce spam in your Blogger blog comments ?

Wednesday, December 30, 2009

spam I really hate those bullshit comments in which the commenter leaves his URL in the end, like “This is really cool site, plz visit my site again , http://djflewjwgjonl3r3.blogspot.com” and other blah! blah! blah! messages. These all are considered SPAM. So how we can reduce this thing in our blog.


If you are using a blogger blog then here is a simple method to reduce SPAM :


1. Click on Settings

1. Just login to your Blogger Account on blogger.com and click on your blogs Settings.


2. Go to Comments


2. Look for Comments Tab under settings page.


3. Choose these options under this section.

3. Under the Who can Comment Section choose Registered Users ( my recommendation ) or Users with Google Account . This will allow only those persons to comment who have accounts on Google, OpenID, Typepad, Wordpress, AIM and Live Journal. Now those Anonymous and unnamed guys to put those crappy comments. Therefore if a person wants to comment he/she should be a registered user of any  of those platforms.


4. You will also find this section and choose as in the image

4. Now head to the comments moderation section and choose Always Ask option. Now whenever someone comments on a post you will be asked if the comment should be published  or rejected. If non-member of your blog leaves a comment then the update will be sent to your email.


 5. Verify Words to prevent bots5. Verify Words to prevent bots

5. Scroll down and you will find Show word verfication for comments and choose yes.When someone comments a Random image with some words will be shown, if they are typed correctly only then the comment will be sent for moderation or posted.


6. Finally you have configured!!

6. Finally click on save settings and you are done.


You may find similar settings in other blogging platforms like Wordpress, Typepad and others.So from now on only publish the comments you feel are safe.


If you Love Struck loved  my post, then feel free to subscribe to my feed Click here!

Best assorted ways to prevent copying of your blog material

Sunday, December 27, 2009

How to copyright your Blog! Did you ever thought of saving your blog content from copying by others? then think once more because many thieves out there must be eyeing on you content and using them on their blog under their name.In this way plagiarism kills the credibility of blogger. Though we cannot completely stop others from copying our content but this can be prevented to some extent. In this post you will learn how you can do this, so go ahead.


Below are some tips which will help you in protecting your blog from online thieves:


1. Myfreecopyright.com : I am using this service on my blog and I should say that its working great ! . You Sign-up with them and then enter the URL to be protected (that is your BLOG!). After this whenever you blog they send you the copyrights of the post on your email-id. This makes you the registered writer of the post. They also give you a badge is displayed on your blog to show the visitors that your content is copyrighted


2. Copyscape.com: Copyscape lets you search for the copy of your blog posts on the web. You have to pay if you want to search for more than 10 results by signing up with Copyscape Premium. However they give you free banners to be put up on your blog that prevent others from copying.


3. Use Watermarks : If you are using images on your posts, that are genuinely created by you then you should put up watermark on those images in light color so that they don’t create messy images. The watermark could be in the form of blog address, blog title or your blog logo.


4. All rights reserved: At the bottom of the blog page, write your copyright year followed by blog name and then the message All rights Reserved. This can be seen on most of the professional and popular blogs. This shows that all the content on the blog is copyrighted by you (the author!).


So apply any of these simple 4 tips and save your blogs identity from others.


If you Love Struck loved  my post, then feel free to subscribe to my feed Click here!

Print screen is ancient, use Snipping tool in Windows 7 and Vista

Tuesday, December 22, 2009

stooll Many of us often take screenshots of our screen for posts, presentations and other things. We do this by hitting the Prt Scr  that is the Print Screen button on our keyboard. Sometimes we need the screenshot of a particular area of screen but Print screen takes the snap of the whole screen. Now there’s an inbuilt windows solution for this problem.


If you are on Windows 7 and Windows Vista then you can use a great tool which the Microsoft People have included in these windows. It’s called the Snipping Tool. With its help you can quickly take screenshot of any area of the screen. Here’s a small demonstration of using Snipping tool in Windows 7:


1.OPEN

1.Go to start Menu and click the Snipping Tool. If its not in the menu, then Search for it using the search tool.


2.SNIPPING TOOL OPENS

2. When it opens, the screen becomes whitish and you can only see the snipping tool window clearly. Your arrow will also transform into a plus sign for selecting screen area.


3.SELECTING

3. Then select the area of your screen by holding the click and moving your mouse. When leave the click the area will be cropped and program window will open.


4.HIGHLIGHTING

4.Now you can save the screen shot by clicking the save snip button or you can use other tools like Pen, Highlighter and eraser to edit your shot. In case you take the screen shot of text document then Highlighter can be of great use to you, it highlights the screen just like a highlight marker.


5.SAVING in Different Formats

5. After you are done editing, just save your shot into of the formats like jpeg, png, gif and HTML MHT.


So no more taking screen shots with Print Screen button and then editing in Paint or any other software. Just use Snipping Tool and start saving you screenshots easily.


If you Love Struck loved  my post, then feel free to subscribe to my feed Click here!

Google Adsense Do’s and Don’ts

Friday, December 11, 2009

Google ADsense Do's and Don'ts.. Google Adsense is one of the most healthy way of making money online with blogs and websites. Thanks to Google who is helping millions of people around the world make use of their awesome service.


If you have started using Google Adsense or already using Google Adsense then here are some small tips to help you get the best out of this great program:


  • Patience- If you are not getting enough clicks or Clicks on your ads are not changing into money then do not loose patience, as it always takes some time for a Blog to gain readership and get the maximum rate per click. The click to rate conversion depends upon the Page Impressions and unique visitors to your Blog.


  • Stop clicking on your own Ads as Google is smart enough to catch the defaulters and block their accounts if you do this daily. This makes Google watch you with a doubt and finally it may even end up in criminal penalties.


  • Never use Automated Tools for increasing your blogs CPM or clicks on Ads because Google counts this as illegal.


  • Stop asking People to click on your Advertisements. Many people write a line below the ads requesting people to click.


  • Do not form groups to click on each others ads because when simultaneous clicks come from same IP’s again and again, there is no click to rate conversion.


  • Do not put excess of Google Adsense ads on your pages as it distracts most of the visitors from visiting your blog and hence decreases the readership of your blog.


In the end I would say that let the visitors click naturally on your ads and then you would see that even small clicks leads to good rate conversions.


If you Love Struck loved  my post, then feel free to subscribe to my post &

get them sent into your Inbox Click here!

How to get maximum diggs! to your posts

Saturday, June 14, 2008

nucleus


Digg.com is a web site which helps you make your posts popular & give your post opinion of public. The web site has changed the way the people used to read the articles & has allowed them to give their views about in a most simple that is Digging the post. If your post is interesting then your post would definitely get digged! by many, if not then no Diggs!!.


Many people has asked me about increase the number of dggs on their posts, so I have finally come up with some tips, hope they help you get maximum of Digg.com.


  • Latest Updates : Try writing about the latest news. Its a fact that Latest News get more viewers & hence the posts will automatically get more diggs! & will become popular.


  • Unique Content : Always write the posts yourself, that is don't copy the content from other blogs & hence your blog will get more unique & will be liked by more people.


  • Add Videos : You can add videos with your posts, which allow people to read , as well as watch the thhings related your posts.


  • Add Images : Embed beautiful images which can explain the idea in your every post. Now on the Digg.com whenever you Digg any story, you can add images which are inside the post. This attract a lot of readers, which give you a good number of diggs!


  • Using BlogCatalog.com : There are many communities on BlogCatalog.com which gives you Digg Exchange, you just have to digg their posts & they will automatically digg yours back too!


  • Make Friends : You can make friends on Digg.com & many other social bookmarking sites & then these friends can be asked about digging your posts & then you do the same too! .


  • Blogging about Wordpress : As you have noticed in my earlier posts about i have told people how  Wordpress affects your Technorati, Alexa & similarly you can get too many diggs for your post mentioning about the new Wordpress Theme or plugins. Wordpress is a popular blogging platform & i would say about 65-70% bloggers are using it today!. So, any post which provide people any new wordpress stuff become popular among people easily.


If you lovedLove Struck my post, then feel free to subscribe to my post &

get them sent into your Inbox Click here!

How to stop highlighting new programs in Windows XP

Friday, June 6, 2008

dreadbob-xp

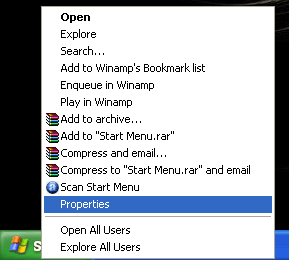
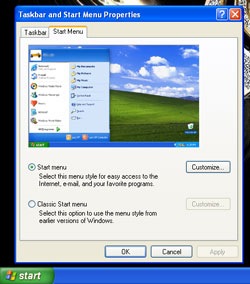
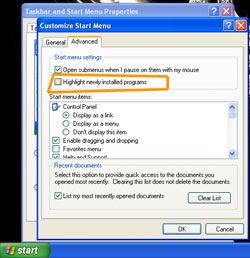
Whenever we install a new program in Windows XP, then the programs get highlighted under the Start menu. The menu shows the new programs for some days & if you think you don't need to remember the newly installed programs & want them to look normal, then just follow these simple steps:


  • Right Click on Start Menu.
  • Select Properties.

    dreadbob

  • Then under Start Menu tab select customize.

    dreadbob

  • Now click on Advanced tab.

    dreadbob-535

  • Now remove tick from the
  • 'Highlight Newly Installed Programs'


  • And choose OK.
  •  

    Now the newly installed program will not be highlighted & will be displayed normally.


    If you like these small tricks then feel free to subscribe to my feed .

    Stay tuned for more tips & tricks...Wave

    Add an image to your blogger header

    Thursday, May 24, 2007

    How to add a video to my blog?

    Thursday, February 15, 2007

    Add a video you like to your blog from either Youtube or Google Video.

    From Youtube:


    YoutubeIn the upper right hand of the page, next to the video is a box with a link and an embed code.

    To embed this video right onto your blog copy the code (Ctrl+C) in this embed box.

    From Google Video:


    Google VideoOn the right side of the video is a link that says "Email - Blog - Post to MySpace". Click on this link.

    When you click that link some more links show up. Click on the one that says "Embed HTML".

    If you want to embed this video right onto your blog, copy the code (Ctrl+C) in the embed box.


    Into your Blogger Dashboard:


    Blogger dashboardPaste the code (Ctrl+V) you saved earlier right into the text area.

    How to install a Blogger XML template

    Thursday, April 13, 2006

    Make sure you have backed up your template before installing a new one.

    (You can also install a HTML template).

    1.


    You have to choose a XML Template


    2.


    Save the XML file on your hard disk.


    3.


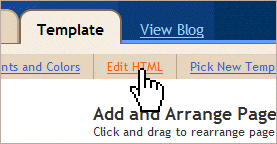
    Go to your Blogger Control Panel - Edit HTML


    4.


    Browse the XML file you have saved and upload it.


    5.
    Finished!

    Related Posts with Thumbnails


    Copyright © Blog Rescue